You step out of a hot shower, wipe the mirror and catch a musty smell. The ceiling around your old fan is peeling, and you're starting to worry about mold. Sound familiar? It might be a weak bathroom fan, which does more than fog up the glass; it traps humidity in your walls, grout and fixtures — putting your indoor air quality at risk.
Upgrading to a modern fan can clear moisture faster, help prevent mold and improve airflow, all while running whisper-quiet. Keep reading to spot the signs it's time for a new fan, get a step-by-step guide for the replacement process and explore what to consider before you start.
Is It Time to Replace Your Bathroom Fan? Here's How to Tell
Before you buy a new fan housing or pull out the screwdriver, make sure a replacement is actually in order. Here are the most common red flags that it's time to retire an old bathroom exhaust fan:
- Poor airflow: If your mirrors stay fogged for more than a minute or humidity lingers, this might signal that the existing fan can't move enough air per minute.
- Loud operation: A rattling fan motor or noisy fan blades often means wear on bearings or an outdated design never intended to be quiet.
- Moisture and mold issues: Peeling paint, mildew spots or musty odors point to high humidity and potential mold growth.
- Outdated or inefficient model: Older exhaust fans lack smart sensors, burn excess electricity and may not meet today's ENERGY STAR® standards.
- Remodeling or aesthetic upgrades: A bathroom remodel is the perfect moment to install a sleeker, ultra-quiet bathroom vent fan that blends with new tile or fixtures.
- No fan at all: Some older homes rely on a window, which rarely provides consistent ventilation and leaves walls prone to moisture damage.
Why Your Indoor Air Quality Matters
A ventilation fan isn't just another ceiling fixture — it's a frontline defense against excess humidity. By whisking moist air outside, it keeps drywall, trim and even water heaters nearby free of condensation. That moisture control limits mold spores, helping you avoid costly repairs and respiratory irritants. Consistent airflow also protects paint, grout and fixtures, preserving the fresh look of a recent remodel.
A healthier environment, lower humidity levels and quieter bathing routines all start with the right fan.
8 Steps To Replace Your Bathroom Exhaust Fan
Replacing a bathroom exhaust fan is well within reach for most DIY-minded homeowners. Follow the eight general steps below to remove the old fan, fit a new ultra-quiet model and improve airflow. And for safety and optimal performance, always follow the manufacturer's installation instructions.
1. Assess Your Current Setup
First, figure out if you can install the fan from below or if you'll need attic access. Make sure the fan vents to the outside — not into your attic insulation. Also check for any potential obstacles like low rafters or nearby water heaters.
2. Find the Right CFM and Noise Level (Sones)
To calculate the needed cubic feet per minute (CFM), multiply your bathroom's length × width × height to get the cubic footage, then multiply by 0.13. As an example, a 70 sq. ft. bathroom with 8 ft. ceilings needs about 73 CFM. For a quieter experience, look for a fan rated under 1.0 sone; under 2.0 is still comfortable for everyday use.
3. Gather Your Tools and Safety Gear
Remember, safety first — always cut the power, wear goggles and use stable ladders. Along with your basic tools (like a drill/driver and jab saw), grab foil tape, flexible ducting, wire nuts and a voltage tester. That tester is critical to double-check the power is off before touching any wires.
4. Disconnect and Remove the Existing Fan
Turn off the breaker and confirm with the tester that there's no power. Then, take off the grille, disconnect the wiring, unscrew the unit and slide it out. Tape off the wire ends while you're working for safety.
5. Prepare the Installation Area
If your new fan is bigger than the existing hole, carefully cut the drywall to fit. If it's smaller, no worries — you can patch gaps with drywall scraps and joint compound after it's mounted. Take a moment to inspect the framing for any damage or mold.
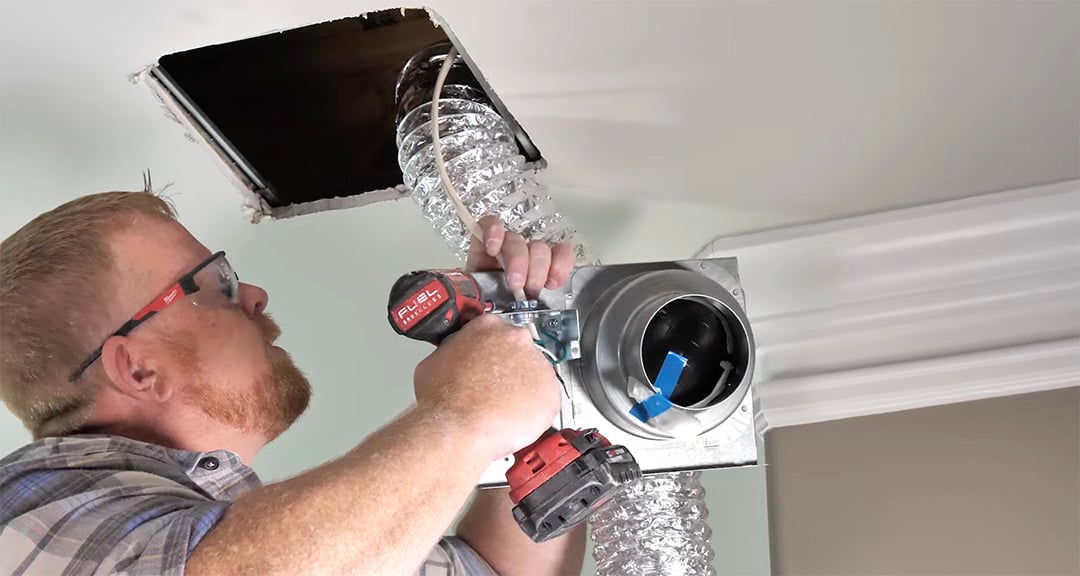
6. Install the New Fan Housing
Fit the housing into place, making sure the duct collar lines up with your existing duct. Secure it to the joist using mounting rails or wood blocks. For the best airflow, keep the duct run short and straight. Then, seal all duct seams with foil tape.
7. Wire the Fan and Attach the Grille
Match the house wires to the fan wires: black to black, white to white, ground to ground. Twist on wire connectors, tuck the wires under the cover and snap the grille into place.
8. Test, Seal and Maintain
Turn the breaker back on and listen for a gentle hum. Then, check outside to make sure air is venting properly, and seal around the grille with a thin bead of caulk for a clean, airtight finish. And don't forget to give the fan blades a quick clean every six months to maintain efficiency.
Key Considerations for Replacing Your Bathroom Fan
When replacing an old bathroom fan, a few planning details will help you stay on budget, avoid code headaches and enjoy long-term performance. Here are considerations to help you find the right fit:
Cost and Time Estimates
- Materials: A quality ENERGY STAR® bathroom fan ranges from $120 to $250, plus $15–$40 for supplies like foil tape, wire connectors and flexible duct.
- DIY labor: Expect three to four hours for a straightforward roomside replacement, a half day if you need attic work or drywall patching.
- Professional labor: Electricians or HVAC pros typically charge $200–$500, depending on ceiling height, wiring complexity and roof vent access.
Installation Types
- Roomside "no-cut" models slide right into the existing ceiling hole — perfect for bathrooms without attic access.
- Attic-access models typically offer higher airflow and easier duct routing, but they do require stable footing and managing insulation.
Ventilation code compliance
U.S. and Canadian building codes require fans to vent outdoors to prevent moisture buildup. To keep up with compliance codes:
- Use smooth, insulated ducting with minimal bends.
- Seal joints with foil tape.
- Make sure the exterior wall cap or roof vent is clear.

When to Seek Professional Help
DIY enthusiasm is a great starting point. But, in some situations, calling a licensed professional is the smarter choice, especially when you're up against:
- Outdated electrical wiring: cloth-covered conductors, lack of ground wires or no GFCI protection.
- Inaccessible ducts: long, hidden runs or those that must weave around tight ceiling joists.
- Structural changes: enlarging framing or cutting new roof vents that could affect load-bearing members.
- Persistent issues and code concerns: tripped breakers, poor airflow after installation or uncertainty about local ventilation codes.
A professional electrician or HVAC contractor can upgrade circuits, reroute ductwork and ensure the new fan's CFM rating matches your bathroom's cubic feet. They can also recommend a fitting protection plan.
Bathroom Fan Replacement FAQs
Planning a bath fan upgrade? Here are answers to the questions homeowners ask most often:
Do I need an electrician to replace a bathroom exhaust fan?
Bring in a licensed electrician when:
- Your house wires lack a ground.
- The breaker panel needs a new circuit.
- You plan to add features like a heater or integrated LED light that increase load.
How can I tell if my new fan is working correctly?
Hold a tissue near the fan grille — if it's pulled firmly against the grille, airflow is strong. You should also feel moist air exiting the roof vent within seconds of turning the fan on.
What are the quietest bathroom fan options under 2 sones?
Panasonic WhisperFit®, WhisperCeiling® and WhisperGreen® DC fans operate as low as 0.3 sones, delivering near-silent performance without sacrificing power.
Explore our full lineup of bathroom exhaust fans.
Which models include extra features like lights or sensors?
The WhisperChoice® DC Fan with LED Light and Humidity Sensor pairs a dimmable LED with a smart humidity sensor, turning itself on automatically to keep moisture in check. For chilly mornings, the Whisper Cozy™ Fan/Heater Combo adds an efficient heater for instant warmth.
Breathe Easier With a Better Bathroom Fan
A high-performance, ultra-quiet bathroom fan upgrade means healthier air and long-lasting comfort every time you flip the switch — and Panasonic makes it easy.
Panasonic Whisper-series fans deliver powerful ventilation at under 0.3 sones (quieter than a whisper). ENERGY STAR® certified, they help lower energy bills, while smart sensors handle humidity automatically. Plus, durable DC motors and quick-mount housings make installation fast and frustration-free for DIYers.
Ready to find your perfect match? Explore Panasonic bathroom ventilation fans to find the right solution for your home.


